Welcome to the Fancy Girl blog!

I am so glad you are here! Join me in my journey for all things fancy and fun!

Find out more about Michelle and how the Fancy Girl blog (formerly Glamourviews) got it's name and the goals for this site.

Learn more about the best of the best and try something new!.

Learn all the lastest in beauty trends from a Pro Makeup Artist

Makeup, hair and beauty tips for Prom, parties and everday. Especially for Teens.

Showing posts with label False Eyelashes. Show all posts

Friday, March 02, 2012

Dollar Store False Eyelashes - Yay or Nay?


While on a fun shopping day with my daughter, we decided to stop by the 99 Cent store to get her a toy.  I love to check out the beauty section and to see what little gems I could find.  And this was my lucky day!  To my surprise I found a wide array of false eyelashes for less then a $1 each!!  But are they good?  I purchased one of everything they had.  I figured, why not?  They are only a dollar each.  I'm sure I can use them in different ways other then lashes if they looked terrible.

Moving on to our girl's night out.  I decided that this was a good time to give them a try.  I went with the S1 lash.  They looked like a glammed up version of a natural lash.  I noticed right away the the lash was not real human hair, but a synthetic.  That's ok.  I just would never put these on a bride or for something very special.  But for being a synthetic they were very light.  And they looked great on.  Good shape, good length, great feel.

Removal of the lash from it's container was effortless and of course with my DUO glue it stuck on my lash line fabulously all night long.  I asked everyone what they thought and they thought they were real.  I'll go with that!  

Overall, I say, why not?  These lashes are super fun to play with and for the investment you won't be loosing out.  And you won't feel bad about throwing them away after one application. 

For a location near you click here.

Check out my PRO Makeup Artist website here!


Wednesday, February 22, 2012

Feathered Lashes!! OMG so GORGEOUS!


This is probably one on my most absolute favorite photoshoots ever!  These lashes were so fun and the hair was immaculate.  Although it was hard for the models to get into character (they kept giggling   It's hard being so serious!) they did an amazing job!  Warren the photographer is so light and happy all the time, made for some fun times.  I can't wait to do another lash shoot.  Lashes are my passion!

Janneth's Look: 
Eyes-
MAC Cosmetics Vex eyeshadow all over the lid concentrated and softly brought up to the brow bone. 
MAC eyeshadow in Humid in the crease, heavy.  And applied to the lower lash line.

Cheeks- MAC Bronzer

Lips- MAC Lipstick in Freckletone


Tatyana's Look:
Eyes-
MAC Cosmetics All that Glitter's eyeshadow all over the lid and up to the brow bone and around the tear duct.
MAC Cosmetics Mulch eyeshadow in the crease, copy to the lower lash line.

Cheeks- MAC Bronzer

Lips- MAC lipstick in Cherish

The lashes are from a Trade Show that I went to.  But you can find these very similar at www.ebay.com

Get MAC Cosmetics here.

Photographer:  Warren Hearl of Imagigraphics
Hairstylist: Carrie B. Mac Hair
Makep Artist: Michelle Kinkaid - www.michellekinkaidmakeup.com
Models: Janneth and Tatyana Fomina

Check out my PRO Makeup Artist website here!

If you like what you read, share and subscribe!  Leave a comment so I know you stopped by!

Tuesday, February 21, 2012

The Three Section False Eyelash Technique


Scroll down for the how to video!

When you are first learning how to apply false eyelashes, especially strips, it can be a very frustrating experience.  Maybe it didn't stick properly on the corners.  Or you didn't get it perfectly on the lash line.  There are many kinds of issues that can happen.  So here is an easy way to get those lashes on perfectly.

 If one corner starts to lift, you just rework that section and leave the others alone.  And by working one section at a time this gives you greater control on how close and acurately you get the lashes on.

This technique may take a little longer to prep since you are cutting, and then glueing each section.  But the time it saves in having to keep redoing the work will save you a headache. 

What you will need:
Lashes of your choice
Eyelash Glue (I like to use Duo found at most drug and retail stores like Target)
Small pair of sissors

The Cliff Notes:
1. Take your lash off of the container.
2. Measure the lash on your eye and determine if you need to trim to fit your eye.  Cut where needed. (Tip, cut on the outer edge of the lash, not the inner lash.)
3. After you have trimmed, if needed, cut the lash in 1/3's. 
4. Glue each peice with a thin strip of lash glue and place glue side up back on the carton to get tacky. (Tip: Make sure you place your lashes back in order so you don't get confused.  Start with the inner first, then middle, then outer.)
5. By the time you have each sectioned glued, the first section should be tacky.  If not, blow on it for a few seconds or wave it in the air.
6. Start with the inner corner and place it where you want it.  Pat down gently with the end of an eyeshadow brush or an orange stick.
7. Repeat with the middle, then the outer.
8. Repeat these steps on the other eye.
And your done!

To learn the traditional way, check out this video here.

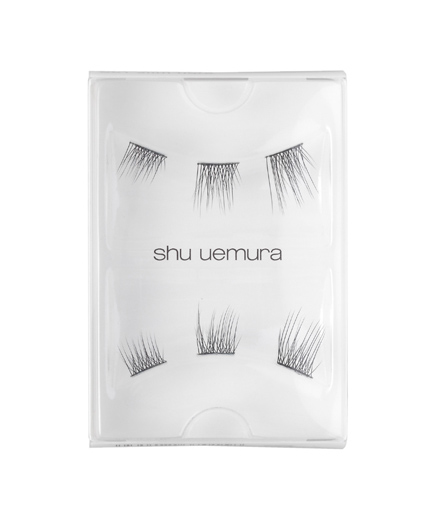
If you don't want to do the cutting part yourself you can also look into Shu Uemura's Slim Partial's $13.00 and found at most department stores, since they already have done it for you. 

Check out the how to video below!


Get the amazing lashes shown in the top photo at Eyelashes Online.

The lashes that I used are the Red Cherry #747M found at Madame Madeline.

Check out my PRO Makeup Artist website here!

If you like this post please share and subscribe!  Leave a comment so that I know you stopped by!

Sunday, February 27, 2011

Video Tutorial - How to Apply False Eyelashes

Finally!  My first video tutorial!  It took me awhile because I really just needed to be comfortable with seeing how I looked on camera.  I am still not entirely happy, but I think with practice and time my videos will get better. Not to mention how many hours it takes to do simple editing!  And YouTube limits the time you can do the videos.  So, here it is!   Enjoy!

You will need:
DUO eyelash adhesive
Eyelashes of your choice.  I am using Red Cherry's #523.
Orange Stick or end of a brush.
Mascara

Tips:
Try on the lashes before applying the glue and trim as needed on the outer eye part of the lash.
Only apply a thin layer of the glue on the base of the lash.
Put a tiny "bead" on the tips.
Let glue air dry for about 20 seconds or until it is tacky.
Curl real lashes first if the grow downwards.
Hold both ends of the lashes and place on the lash line, NOT on your real lashes!
Press into your lash line with the end of a small makeup brush or orange stick.
Glue will show white at first but should dry clear.
If you make a mistake, simply remove the lash and clean the glue off.  Try again.
Use a regular mascara like Mabelline's Great Lash to blend the real lashes and fake lashes together. 
Don't forget mascara on your lower lashes.
You can use your lashes 10-12 times if you take care of them.  Just wash the lashes with facial soap and air dry the container they came in. 

Where to buy:
Red Cherry Lashes http://www.madamemadeline.com/ $1.99
Duo lash adhesive CVS stores $4
Makensie Ring $75 and Mimi earrings $34 from www.guyandeva.com/michellekinkaid

And there you go!  I would love to see how you do!  Post comments and pics below or on www.facebook.com/mkmakeupartist.com.  Good Luck!

Monday, February 14, 2011

Review - Red Cherry 100% Human Hair Eyelash Strips

When I had read an article that Kim Kardashian and her family only use Red Cherry 100% Human Hair Eyelashes, I immediately hit Google to find out how I can get them.  Have you seen how insanely long their eyelashes are?  And perfect?  Can you tell I am seriously jealous?  They are surprisingly not offered at many stores.  But the best price I found them for was at http://www.madamemadeline.com/.  They were only $1.99 a pair and you got free shipping if you spent $85.  I know that seems like a lot of pairs of eyelashes but for the beautiholic such as myself that's a bargain.  Especially since Red Cherry offers a huge selection to try.  In addition to the already low price of these lashes Madame Madeline sent me 2 free pairs.  What a deal!  Just to give you a comparison MAC offers 100% human hair lashes for around $15 a pair.  Now you understand why I am so excited. Did I mention that Red Cherry's lashes are 100% Human hair and NOT synthetic?  Well that can be a big difference.  Human hair is much lighter and natural feeling then a synthetic lash.   So I placed my order.  Roughly 40 pairs and almost all of them different. 

The shipping was so fast.  Just about 4 days.  I opened up my box and my heart soared.  Ahhhh.  They are gorgeous!  The packaging isn't very attractive, but I don't care.  It's what's inside that counts.  Some of the lashes are really dramatic.  I wouldn't even wear them except for a fashion shoot or for Halloween.  Or if I was a drag queen.  I think some people could pull it off such as the Kardashians, but not me.  There are so many that are appropriate for everyday, for weddings, for a night out.  For those of you that want a little umph.  My favorite for a natural look is the 747M (pictured).  This style also comes in a small and large.  (M is for Medium).  I would recommend a small if you have Asian eyes, small eyes or very little lashes.  Medium for medium length lashes and eyes, and large for you know, large eyes.  I also had a bride that loved the #1 for her big day.  I am amazed at the quality of the lashes for the price.  I would put them up there with MAC's line.  They are easy to apply, light to wear, and very comfortable.  The range of styles is impressive too.  And you can't beat the price.  My vote is 5 lip smacks.  Hands down my new favorite lashes to wear.  Go get yourself a pair or 40.

How do you apply False Eyelashes?  Check out this video!


Check out my Professional Makeup Artist Site!