Welcome to the Fancy Girl blog!

I am so glad you are here! Join me in my journey for all things fancy and fun!

Find out more about Michelle and how the Fancy Girl blog (formerly Glamourviews) got it's name and the goals for this site.

Learn more about the best of the best and try something new!.

Learn all the lastest in beauty trends from a Pro Makeup Artist

Makeup, hair and beauty tips for Prom, parties and everday. Especially for Teens.

Showing posts with label Makeup 101. Show all posts

Tuesday, February 21, 2012

The Three Section False Eyelash Technique


Scroll down for the how to video!

When you are first learning how to apply false eyelashes, especially strips, it can be a very frustrating experience.  Maybe it didn't stick properly on the corners.  Or you didn't get it perfectly on the lash line.  There are many kinds of issues that can happen.  So here is an easy way to get those lashes on perfectly.

 If one corner starts to lift, you just rework that section and leave the others alone.  And by working one section at a time this gives you greater control on how close and acurately you get the lashes on.

This technique may take a little longer to prep since you are cutting, and then glueing each section.  But the time it saves in having to keep redoing the work will save you a headache. 

What you will need:
Lashes of your choice
Eyelash Glue (I like to use Duo found at most drug and retail stores like Target)
Small pair of sissors

The Cliff Notes:
1. Take your lash off of the container.
2. Measure the lash on your eye and determine if you need to trim to fit your eye.  Cut where needed. (Tip, cut on the outer edge of the lash, not the inner lash.)
3. After you have trimmed, if needed, cut the lash in 1/3's. 
4. Glue each peice with a thin strip of lash glue and place glue side up back on the carton to get tacky. (Tip: Make sure you place your lashes back in order so you don't get confused.  Start with the inner first, then middle, then outer.)
5. By the time you have each sectioned glued, the first section should be tacky.  If not, blow on it for a few seconds or wave it in the air.
6. Start with the inner corner and place it where you want it.  Pat down gently with the end of an eyeshadow brush or an orange stick.
7. Repeat with the middle, then the outer.
8. Repeat these steps on the other eye.
And your done!

To learn the traditional way, check out this video here.

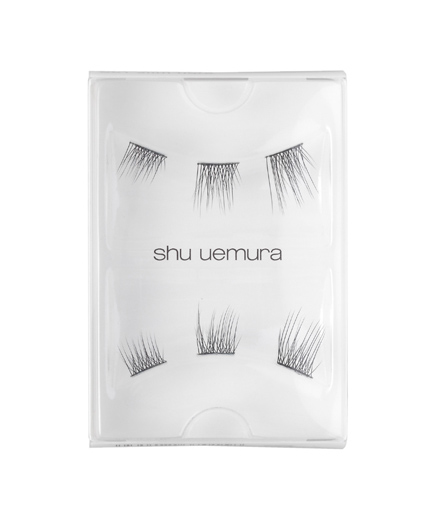
If you don't want to do the cutting part yourself you can also look into Shu Uemura's Slim Partial's $13.00 and found at most department stores, since they already have done it for you. 

Check out the how to video below!


Get the amazing lashes shown in the top photo at Eyelashes Online.

The lashes that I used are the Red Cherry #747M found at Madame Madeline.

Check out my PRO Makeup Artist website here!

If you like this post please share and subscribe!  Leave a comment so that I know you stopped by!

Thursday, January 12, 2012

How to Choose the Right Eyeshadow for your Eye Color

Although I don't believe in "rules" for Makeup Artistry, since it is "artistry", there are some guidelines to follow for the best possible way to make your eyes pop.  Typically a contrasting shade, not a similar shade, is best.  For example, blue eyes with blue eyeshadow don't offer that "wow" effect in making the blue eyes stand out amongst the color.  Instead the eyes kind of gets swallowed up in the color of the lid and just looks more blue.  Brown eyes have the most choices being a neutral color.  Jewel tones are also amazing on browns.  

Colory Theory:
Without going too indepth about Color Theory, the simplest way to put it is that any three colors next to each other are related colors.  While the colors directly opposite each other are complimentary.  To enhance your eye color choose related colors - similar shades will intensify it's color.  On the opposite spectrum, make your eye color "pop" with dramatic contrast choosing complimentary colors.  For example, orange is the opposite for blue on the color wheel.  So an eyeshadow with an orange tint such as a coppery color will make them really stand out. 


Here are the guidelines to follow for your eye color:


Blue
Complimentary-Taupes, warm browns, soft peaches, copper, ocher, terracotta
Related- Navy Blue
Green
Complimentary -Golden red browns, warm taupes, deep and soft purples, wines, burgundy
Related - Moss green
Brown
Complimentary -Brown does not have a complimentary color.  But most colors look amazing.  Bring out the gold in brown by choosing soft browns with a golden tint.  Purples and greens look stunning on browns.
Related - Chocolates
Hazel
Complimentary- Blue, violet, purple, red tones like burgundy.
Related- Olive, gold, emerald green, and orange tones.


Check out my PRO Makeup Artist page here!

Saturday, August 06, 2011

Video Tutorial - How to Clean and Disinfect Your Makeup Brushes

This video shows you how to easily clean and disinfect your makeup brushes for either light, moderate or heavy usage.  This system is not created by me.  I learned how to do this on YouTube a long time ago, but this is my preferred method out of the tons you can do.  I also tell you when and how you should be cleaning them.

Daily and in between clients/colors:
MAC Brush Cleaner.  Get the spray nozzle at Sally's.  Simply spray a bit on a clean towel or paper towel and move the brush in a circular motion.  This is alcohol based so it will disinfect.

Baby Shampoo Method:
Do this once a week for personal use. If you are a makeup artist put your dirty brushes that you used in a plastic zip lock bag.  When you get home wash with the baby shampoo.

EVOO/Baby Shampoo deep clean:
Do this about once a month or every two weeks if you are a makeup artist working consistently.  Start by giving your brushes a pre-treatment by putting Olive Oil on a strong paper towel and rubbing the brush head in a circular motion.  This will loosen up any deep down dirt, oils, product and bacteria.  Then wash in warm water using the baby shampoo to remove extra dirt and the olive oil. 

Tips:
1.Wash the brush with the bristles pointing downwards.  Do not flip the brush bristles up while wet or running in the water.  This will cause the water to drip into the feral (the metal part) and loosen up your bristles resulting in thinning. 
2.You also don't want to get the wood handle wet.
3.For large fluffy brushes wash in a circular motion.  For flat or synthetics brushes go back and forth.
4.When finished squeeze out extra water in a dry towel.
5.Test to make sure the brush is clean by wiping it on a clean towel and see if there is any residue still coming off.
6.Reshape the brush and lay flat on a dry, clean towel. 
7.It may take over night for the brush to dry.  Larger brushes will take longer.

Hope you found this helpful!  Let me know what you think and what else you would like to see me do!  Comment here or Follow me on www.facebook.com/mkmakeupartist and www.twitter.com/michellekinkaid.

Subscribe to my YouTube Channel - It's FREE!


Thursday, March 03, 2011

Tutorial- Contouring Basics for a Flawless Face


Here is my second video instructing on Contouring Basics.  You can really get deep into contouring techniques, but in this video I show you quick and basic contouring and highlighting.  This can be applied for everyday, or just for special occassions.  Contouring changes your facial structure by creating an illusion using dark and light makeup. 

I had to do this in 2 parts because of YouTube time constraints.  So, sorry about that!  I hope you find this video useful!

You will need:
Concealer 2 shades lighter than your skin color
Liquid Foundation 2 shades darker than your skin color
Liquid Foundation in your normal skin color
Blush of choice
Small fluffy brush to blend concealer
Large synthetic brush for contouring
Stipeling brush for foundation
Blush and Powder brushes

Tips:
Highlight the areas you want to bring out more.  Like your cheekbones.
The darker makeup will make your features receed.
You can use powder or bronzer as your contouring makeup.  But I perfer liquid because it blends more smoothly.
Use a fluffy brush to blend out concealer.  This gives a soft airbrushed look.
Do this after you have done your eye makeup so that your can "wash away" any fall out.
Put your blush on after you finish the foundation then powder to make your blush look really soft.
Use MAC's Strobe Cream where you highlighted for added luminosity.

Where to buy:
Mary Kay Concealer in Light Ivory - $12(I can order this for you at 30% off, just message me)
L'Oreal True Match Foundation in N8 -  $12 Drugstores everywhere
Makeup Forever HD Foundation in #118  - $40 http://www.sephora.com/
MAC Dame Powder Blush - $19.50 http://www.maccosmetics.com/
MAC Strobe Cream - $29.50 http://www.maccosmetics.com/
MAC Mineralize Skinfinish in Medium Plus $27 http://www.maccosmetics.com/
Paris Presents fluffy brush (concealer) - Walmart Stores $9
Other Brushes by MAC Cosmetics
Nala Ring by Guy and Eva $34